Showing posts with label quilting. Show all posts

Sunday, January 9, 2011

New Quilt....

I have finally decided the next quilt design, and started the first few squares. I am making this one in my old familiar way... small squares, quilted as I go, then huge job of banding the squares together to make the whole.

The design is log cabin, but with the twist of ignoring the typical light/dark or one colour/other colour organization of the "logs". Instead it will be black square in the center, random green and aqua pattern cottons for all the rest. The backing is black and white cottons, cut to 11 inches. I layer the batting over the backing square, then center the small black center square. Pin in place. Then I work the logs around the square, building out to the edges. Each seam is 1/4 inch and flipped and ironed before the next log is laid out. The seams effectively quilt the layers together and no further quilting is necessary, but as you will see I wanted to add detail....

When I am done, I measure and trim the whole block to 10.5 inches square, and set aside for further quilting. The top quilting is done by hand (old-school) and I use a black quilting thread to spiral a running stitch from the center out to the edge. The spirals are about one inch apart, and when I run out of room (near the outer edge) I finish with a small star detail! Cute.

I need lots and lots of these, so will plug away at them when the spirit moves me.

Saturday, November 6, 2010

Cold and Quilting

The November air is COLD and it feels just fine to quilt. I have returned to the bargello small quilt and have started to quilt the layers together. I used a temporary spray adhesive to fuse the top to the batt to the backing. I like to do this before I add the framing. It keeps it small enough to use my regular sewing machine.
It is hard to photo the stitches, because I use coordinating threads, but in the really close up you can see the meandering machine stitch that traces the lines of the various colours. The lines of quilting are about 1.5 inches apart. The final detail will be to stitch around the squares of white, and pale yellow-rose. These squares represent the centers of the lines and contrasts the darker tones.
The framing will consist of 1.5inches of white, and about 4 inches of navy outer border.
Remember to turn your clocks back tonight and enjoy a little extra ZZZZZZZZZZZZZZ!

Sunday, October 3, 2010

Quilt Top Finished

The bargello design quilt top is done. I still need to frame it with two bands and quilt and bind, before finding a suitable wall to hang and display...
but I think it looks pretty cool already.

Tuesday, September 21, 2010

New Quilt

Over one third done of the top panel....

Saturday, September 11, 2010

Kokopeli Done

The inspiration was this cotton fabric....


The finished quilt looks like this!
Arizona Cool....

Friday, August 27, 2010

New Quilt, New Class

I have enrolled in a quilting class at Kindred Spirits. I have not taken a sewing class since High School! It is not that I feel I could not do this pattern on my own, but I wanted the experience of a group project. My knitting friends encouraged this project and attended the class with me.

The new quilt is called Mirage ......

and involves cutting 32 different fabrics into 1.5 inch strips, then sewing in colour panels, then cross cutting in more thin strips. The end result is a quilt made up of one inch squares (or smaller) in a rolling bargello design.

The first day was sewing the panels in the colour combinations that set up the second cuts. My homework before the class was to cut the 1.5 inch strips and stack them in the colour panels. I discovered that my kitchen island was the perfect height for cutting the strips with the rotary blade and cutting matt. Since I rarely actually use it for cooking, it is good to know that it has a practical purpose other than the place to throw the mail and keys....!


My Janome 6600 popped out of the table and was easy (if a bit heavy) to take to the shop and set up with the portable table tray. Next class in two weeks.

Thursday, July 8, 2010

Cutouts

Continuing the work on the applique for the quilt, I drew the rest of the cutout lines and stitched the lines by machine. Then carefully cutting close to the stitches, the resulting applique is very cool and finished! The large design will lie in the center of the queen size bed.

I have not yet purchased the backing fabric and will do so this weekend. Next will be to sandwich the layers, baste in place, then start machine quilting of the 52" by 60" piece.

Close up photos of the cutout design....

Thursday, July 1, 2010

New Quilt, top well underway....


Canada Day for us, means one day off (thursday) and back to work for Friday. Nice morning for golf, cool and sunny. Left the afternoon for sewing, and I spent a few hours working on the center panel of the quilt top. I finished the 54" x 60" pieced blocks, using green rows alternating with turquoise rows, and the Kokopelli batik squares randomly placed in both rows.
Then I sketched a rough Kokopelli in the beige batik, and machine stitched on the outlines. I carefully trimmed close to the stitching, leaving a quarter inch rough edge that will fray a bit on washing and leave a bit of a fuzzy edge to the mystical creature.

There will be further cut-outs throughout the body, similar to the small batik images on the quilt cotton.
I will layer this with batting and background and quilt at this size, then add a border, then more green, turquoise squares, to complete a Queen Size quilt! I will use the sewing machine to free motion quilt stitch around the center motif.

Sunday, June 13, 2010

Kokopelli - New Quilt

I have a vision of a colourful quilt, with a whimsical Kokopelli appliqued at the center. I started making the background of the quilt with blue and green batiks cut in 5 inch squares. The question is how to applique my image, and I saw a quilt last week with topstitched, raw edged pieces, and it looked cool. I thought this could add to the mystical alure of the Kokopelli but decided to try a smaller image on a pillow top, just to see if I liked it.
I stitched it and machine quilted the piece and washed it to see how it would look.
I may also do one with a traditional turned edge applique to compare. This quilt will be queen size, so I want to make sure it is exactly like my imagination says it should be!

Thursday, April 8, 2010

Quilting Continues

I have not had much sewing time for a week, with lots of visitors and activities over the long weekend. Back to normal, I managed to finish the border of the Savanah Quilt on two sides (half done!).

I have also churned out a quick quilt project. It is a book cover for my eBook. It has a grey vinyl cover, so I used that as a pattern for a slip cover. The front and back are a quilted rectangle, and the inside is a non-quilted piece to hold the front and back covers. I machine appliqued my name on the front cover, just for fun.

Tuesday, March 30, 2010

Nothing but Borders Left

I have finished the center of the Savanah Flair Quilt, and have quited all the pieces, and also the bands that join the blocks.
I have the borders to add, there are two different fabrics that frame the center panels and complete the look. It will be a sofa size quilt, nice to throw over the back of the sofa, or pull over you on a chilly winter night. I may even figure out how to hang it on the wall for the warmer seasons.... not sure yet.

I really like this one.

Wednesday, March 24, 2010

Mask and Animal Quilt

I have finished all the bands of the quilt and have machine quilted each band. I like to do this when the pieces are small, as I can manage the pieces through my machine without too much difficulty. This is the first time I have tried free motion squiggle quilting, and I really like it.

I have started joining the bands with 2.5 inch strips. I attach the front and back strip to one side, and the front only to the next band adjoining. Then I pad with batting and hand stitch the back strip closed. Then I carefully squiggle stitch along the length of the joining strip.
Close up shows a loopy stitch pattern running the length of the 2 inch strip. It is a bit hard to see over the feathery print of the strip, but the stitches tie in nicely with the quilting in the bands of masks and animals right next to it.
I will continue with 2.5 inch strips between all five bands of critters and masks. Then wider strips frame the whole center bit, and it is easy enough to top quilt these as they are on the outside edges only.... This quilt has been lots of fun, and I can't help starting to plan my next one.... hmmmmm.

Tuesday, March 9, 2010

I have been obsessed with this quilt top... I just can't step away from it. And look how cool it is so far. I have finished all the applique blocks. The masks are based on the original pattern, but I hand sketched them, as I could not bring myself to wait for the next month to get two more patterns. I have purchased the fabric for the bands and framing of the front and for the backing.
Just love it!

Friday, March 5, 2010

New Quilt

I found this block of the month pattern on the net... Savanna Flair and it totally captured my interest. I went to gather a few yards of fabric, and added it to my bits of cotton stash, and started the first three animals. I luckily found it the last week of February(the first month of the pattern postings) and made the first three times three (nine blocks total) from the first month blocks ... in three days. I used wonder-under to applique the pieces and used my fabulous quilting stitches to "blanket stitch" on the machine around all the edges.

Then came the next month on March 1, and I got the next patterns from the site. That took me one afternoon to cut and applique and machine topstitch the nine squares.
So now comes the dilema... can I possibly wait another month for a couple of mask square patterns?

I was dreaming about the quilt. I was picturing it done and draped over my sofa, looking all cool and african and great next to my carved chest and masks on the wall.

No. I can't wait a month.
I drew my own masks on the wonder under paper and started making my own mask squares....

So the Block of the Month experiment is over... clearly it does not work for me!

(maybe Block of the Day) Block-du-Jour?

Friday, December 25, 2009

New Laptop - New Quilted Cover!

Look at the beauty that Santa brought me!


It is a ten inch notebook, for travelling... email and blogging on the road (I hope that the road trips increase in frequency to allow many, many uses of this cute thing!)
So off I went to make a quick quilted cover for the new baby. As previously posted, I had made a layer of pieced fabric, ready for placemats, but I knew I would have lots, and was suddenly willing to sacrifice a mat or two for my new laptop. I cut the rectangle twice as large as the computer, adding about 1.5 inches all around to allow for seams and shrinking due to quilting. Then I cut a double thick batting to match and backing about 1.5 inches bigger than that.

Next I quilted across the stripes in a spacing that produced squares. I used a fancy quilting stitch (Janome 6600, mode 2, #61) to make these parallel lines, but a plain straight stitch or hand quilting would work.

Then I used a straight stitch to quilt on the seam lines of the stripes.

Straight stitch around the outside of the whole piece, then fold the lining over to finish the edges and topstitch.

Zipper:


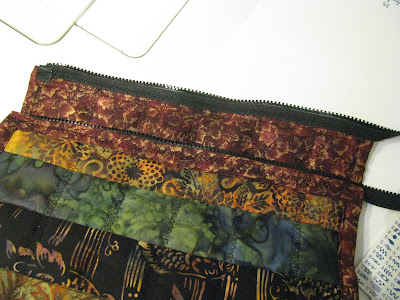
I attached a chunky separating zipper to the wide open side, using a decorative stitch, then used the same stitch to topstitch down both sides of the case. Nice.

Saturday, December 12, 2009

Quilting Progress

Just spent a few hours chugging away at the center panel of the quilt. It is a turtle motif, and I used a Hawaii quilt pattern, which is done by folding the fabric into eight triangles (think eight slice pizza) and cutting half a turtle (like the old paper doll chains or snowflakes from grade school!).

I then topstitched in zig zag around the shell pattern, and then cut the spaces in between.

Eventually quilting between the shell shapes will have the whole shell pop, and should look pretty cool.
Here it is lying on top of some of the squares that will surround the center panel.
I still am undecided as to which way to assemble all the pieces. So far I am just enjoying the small random square assembly. I love the black, tan, burgundy and beige colour way.