Sunday, January 10, 2010

Sewing Machine is Overheating!

Not really overheating, but I have used two 250m thread spools and I am halfway through two more, in my race to finish my quilt... I want it done and cleared up before starting with the same focus on the wedding dress. I don't want dark cotton threads caught up in the white silk seams!


I stopped in at "Gone to Pieces", my local quilt s shop to pick up the batting and backing fabric required to finish the quilt. (The front side was made from quilt squares aquired during my Lancaster, Pennsylvania trip in the summer.) Nancy at the shop was helpful and chatty and even had a sale lingering from the post-Christmas clearances! Good deals.


I have the front in nine 20 inch squares, so the plan was to cut the batting and backing to 20 inches, sandwich together and machine stitch in a couple of cool pattern stitches along the blocks in the squares. The size is easy to handle on my machine and I have 8 of the 9 done as I write this (taking a break after four straight hours over the machine this afternoon!). The next step after I finish the last square is to cut 2.5 inch strips of front fabric and back fabric, attach the strips between the 20 inch squares, and place 2 inch batting in the chanel, then top quilt stitch along the strip to hold all the layers together. These will be only 22 inches in from an edge, so a bit of roll of the quilt should allow it to fit on my regular sewing machine. Last step is binding the edge.

I have always made my quilts with a machine for the pieces, but hand-quilted the layers together. I love that look, but it is very time consuming, and my new Janome makes the machine quilting fun and cool.

Wednesday, January 6, 2010

Sewing Tuesdays

Now that golf is done and the long winter looms, and the Christmas duties are over, I can finally use my one afternoon off a week to really hit the sewing machine and put a dent in my pile of sewing projects....

I finished the batik jelly roll placemats, and ended up with seven of them (one was sacrificed for the cute notebook cover from last week!). Here are a couple of photos. I used the interesting quilting stitches that my machine is capable of Janome (mode 2 - 29 and 33).


I also spent an hour designing the simple bodice pattern for my daughter's WEDDING DRESS. I cut it from scrap fabric first and made two before I liked the shape and it fit the measurements....
Soon I will cut the beautiful white silk and begin. :)

I also hemmed five pants for a friend (a short one), and arranged the 73 quilt blocks into the order I like best, labeled for sewing (to keep them in the order I want while sewing together).
All in all it was a good sewing day, and I rewarded myself with some knitting and watching The Devil Wears Prada on DVR in the evening!
Love Tuesdays.

Sunday, December 27, 2009

Bridal Fabric Flower - Instructions

I am beginning to think and plan the wedding dress... My daughter will be married in May in Jamaica, and our goal is to make a simple, elegant, tropical weight gown, with all the details that she loves.
Last week we took a trip to Ottawa Street in Hamilton (Ontario), the famous fabric district of Hamilton. There are several shops on one block that have bridal fabrics of great selection and amazing prices. We were looking for a medium weight, silk look, with a glow that is not as much as satin. There were a few that would have been fine, but one seemed just right and we brought it home.
With Christmas, I put it aside until today. One of the details she was wondering about is a large fabric flower with pearls and crystals as an attachment to her left hip, where the draped fabric appears gathered to the side. I thought I may have fun trying my hand at creating this piece as inspiration.
Requires: Fabric scraps, "wonder under" (iron on fusing interfacing), floral wire, beads and pearl accents. Hot glue gun.
I started with two scraps of fabric. On the wrong side of one, I lay 8 4-inch peices of floral wire, as in the photo. I then fused one side of wonder-under to the back of the second piece and peeled the paper off, then ironed it over the wire to the wrong side of the first (sandwiching the wire between the layers.).

Then I sketched petal shapes on the outside and topstitched with tight, satin zig zag stitch around the shapes, leaving the wire sticking out the narrow end of the petal.
Carefully cut close to the stitching to release each petal.

Gather the ends together and use hot glue to secure in a bunch (you can wrap a bit more wire there too).

String some crystals onto some wire and secure in a little loop with 5 or 6 beads in the loop. Twist the ends to secure the beads. I made three of these.

I also found some pearl strings already on nylon wire, but you could string your own pearls too.

Then glue the pearls strands under the petals and fasten the crystal loops under a small circle of fabric glued to the center of the flower. Bend and shape the petals to make even and pretty.
This flower is about 6 inches across, and may be further embelished (more petals, more beads, and maybe feathers) when we actually come to attach it to the dress (near the end of the dressmaking process). At least we have something pretty to look at for now.... :)

Friday, December 25, 2009

New Laptop - New Quilted Cover!

Look at the beauty that Santa brought me!


It is a ten inch notebook, for travelling... email and blogging on the road (I hope that the road trips increase in frequency to allow many, many uses of this cute thing!)
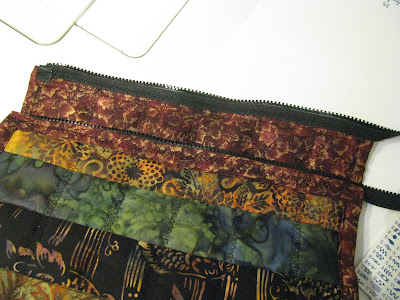
So off I went to make a quick quilted cover for the new baby. As previously posted, I had made a layer of pieced fabric, ready for placemats, but I knew I would have lots, and was suddenly willing to sacrifice a mat or two for my new laptop. I cut the rectangle twice as large as the computer, adding about 1.5 inches all around to allow for seams and shrinking due to quilting. Then I cut a double thick batting to match and backing about 1.5 inches bigger than that.

Next I quilted across the stripes in a spacing that produced squares. I used a fancy quilting stitch (Janome 6600, mode 2, #61) to make these parallel lines, but a plain straight stitch or hand quilting would work.

Then I used a straight stitch to quilt on the seam lines of the stripes.

Straight stitch around the outside of the whole piece, then fold the lining over to finish the edges and topstitch.

Zipper:


I attached a chunky separating zipper to the wide open side, using a decorative stitch, then used the same stitch to topstitch down both sides of the case. Nice.

Sunday, December 20, 2009

Two New Projects

I have had some time with the sewing machine, and have started two things....

First, pretty "jelly roll" of 2.5 inch quilt fabric I brought home from Lancaster, Pennsylvania this summer.
I have assembled the strips into a large, almost 2 yard long piece of fabric. The intention of this is to make new placemats. I will cut across the strips and reassemble into 2 inch squares.

The second is a really creative project. It starts with some fabric pieces given to me by a knitting friend. The fabric is a slightly shiny crinkle taupe fabric, that is a bit stiff. There is enough for a front and back of a coat, but not enough for sleeves. My friend and I discussed the option of making the coat with knitted sleeves and collar, so she went into her knitting stash and found some chunky chenille that matches.
I brought it all home and knit a swatch out of the yarn, and with some experiment, decided to quilt the crinkle fabric to make it as thick as the chunky yarn. I purchased this co-ordinating fabric that will be used to back the quilting.
Chenille knitted swatch, on 6mm needles, gauge 14 sts = 4 inches.

The crinkle fabric without quilting.
The different quilting stitches I was fooling around with.

You can see the basic coat pattern (in red) I will use, adding a pair of pockets and a belt and loops (think trench coat)....
Stay tuned to see this step by step coat production.

Saturday, December 12, 2009

Quilting Progress

Just spent a few hours chugging away at the center panel of the quilt. It is a turtle motif, and I used a Hawaii quilt pattern, which is done by folding the fabric into eight triangles (think eight slice pizza) and cutting half a turtle (like the old paper doll chains or snowflakes from grade school!).

I then topstitched in zig zag around the shell pattern, and then cut the spaces in between.

Eventually quilting between the shell shapes will have the whole shell pop, and should look pretty cool.
Here it is lying on top of some of the squares that will surround the center panel.
I still am undecided as to which way to assemble all the pieces. So far I am just enjoying the small random square assembly. I love the black, tan, burgundy and beige colour way.



Monday, December 7, 2009

Quick Sew Top

The slinky bronze colour fabric picked up in the remnant rack last month, has turned into this....


It is from an old Simplicity pattern, with three pieces, the front and back with slight dolman sleeves, and only top of arm seams and side seams. The sloppy turtleneck is single thickness, with topstitched hem. I used a narrow, close spaced zig zag stitch throughout so that the fabric remains stretchy even along the seams. Nice, non-fray knit, made it easy to start and finish in less than one hour!