Monday, November 29, 2010

Christmas Dress

I am honoured to be making a special Christmas Dress for a good friend. She fell in love with this Vogue pattern...
and she chose a raw silk in Christmas red, with sheer shiny organza for the flower ruffles.... Very stuning.

I started (because I could not wait until I needed to add the sleeves) with the flower detail on the sleeves. It is a clever use of organza strips, folded in half and hand stitched in a swirly pattern to the sleeve.

The body has some serious pleating on the left side.... nice.

Work continues..

Tuesday, November 23, 2010

Coats, Coats, Coats

I picked up this McCalls pattern 5987 a couple of weeks ago along with a lovely boiled wool blend fabric in Plum with sparkles. When I made the coat and wore it to my knitting group night, I got so many oooo's and aaaah's that I ended up with orders for three more coats. It is the kind of coat that fits any body type and has a cool self scarf that can hang straight or throw over one shoulder. The only change to the pattern that I made was a button fastener just under the scarf.

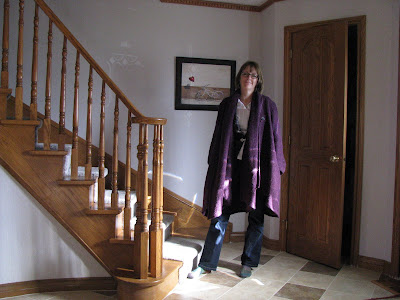
Above is open with the scarves hanging straight down, the front hem is curved and has a nice drape. A bit of a cape look to it, but more coat.

Button closed and one scarf thrown over shoulder, the other hanging down.


The pattern is really simple (you need to know set-in sleeve) but the rest is simple seams and turned edges and no lining. You would need a fabric sturdy enough for single layer coat, and that has a nice reverse side, as it sometimes shows when the scarf is tossed.

Easy to make and to wear. Oh, and it has good pockets too!

Saturday, November 13, 2010

Cool Vest

I found a great fabric at Fabricland last week. It has three layers, quilted together with netting on top, a woven textured multicoloured fabric in the middle and a black light cotton on the backing, all held together with a squiggle quilt stitch. It called out to be something dramatic.


I have a Burda pattern (7499) that has a cool lapel. The experience of embelishing the Warrior Princess dress got me thinking that it would be fun to totally cover a lapel in many, many hot fix metal pieces....
So off I went to get some silver rivetts, round and square, and cut the vest from the great fabric. I sewed a lining to the lapels, then before attaching to the vest, I spent an hour designing and hot fixing the doodads in place! The rest was sewn together as the pattern says. I used facings instead of a full lining (the fabric is thick enough already)....

The final perfection is the swaroski crystal encrusted fastener. I have had this in my sewing stash for two years, waiting for the perfect garment to call for it.


all together fabulous!

Thursday, November 11, 2010

New Pants from Old

I have been on the lookout for new slimmer leg pants (without going "skinny jeans" thin - I don't need leggings).... I have a lot of trouble finding ones that fit right (who doesn't?)

I already have a wardrobe full of nice dress pants that fit at the waist and hip and are long enough (often my biggest fitting problem with off the rack pants). Most of these pants are that wide leg style, hanging straight down from the hip and about 20 inches around the bottom (or more).
I decided to update the look by narrowing my existing pants. This is easy to do if they have regular side seams (no folded overstitched seams like jeans have).

First you unpick the hem and iron flat. Then try them on INSIDE OUT. Most of the pinning will be done on the outside seam, tapering from the hip, evenly down the leg. I also pinned a small decrease on the inside leg from the knee down. Pin about 1.5 inches from the outside edge near the bottom, and about 1 inch from the inside edge (this will reduce the bottom width by 2.5 or 5 inches in total hem circumference! I like about 8 inches across the bottom (lying flat on the ironing board. Make the new seam really gradually tapered from there to the hipline on the outside and to the knee on the inside.... and make left and right leg the same!!!

Hard to see but the photo shows the larger allowance on the top (pinned) and the smaller on the bottom. These pants have fine lines in the fabric, and I used them for guidelines for pinning.


Finish the seams with zig zag stitch and cut the excess. Re-hem the bottom hem and press really well!

Done

Saturday, November 6, 2010

Cold and Quilting

The November air is COLD and it feels just fine to quilt. I have returned to the bargello small quilt and have started to quilt the layers together. I used a temporary spray adhesive to fuse the top to the batt to the backing. I like to do this before I add the framing. It keeps it small enough to use my regular sewing machine.
It is hard to photo the stitches, because I use coordinating threads, but in the really close up you can see the meandering machine stitch that traces the lines of the various colours. The lines of quilting are about 1.5 inches apart. The final detail will be to stitch around the squares of white, and pale yellow-rose. These squares represent the centers of the lines and contrasts the darker tones.
The framing will consist of 1.5inches of white, and about 4 inches of navy outer border.
Remember to turn your clocks back tonight and enjoy a little extra ZZZZZZZZZZZZZZ!