My knitting posse ventured outside our safe yarn medium, into roving and water and agitation. (Wet felting on fabric backing = Nuno-felting). We made a quick trip to
The Fibre Garden in Jordan, where John helped us find the perfect Merino rovings and other yummy fibres. Susan hosted the project in her water-proof basement. We started with scarf sized fabrics. Mine was a synthetic netting in black with silver shimmer on one side. Ruth, Fiona and Lois used silk chiffon in black. Susan supervised and assisted, as she was the "expert" having felted like this once before! (learn then teach... it's the craft version of pass it forward). My fabric is not a natural fibre and will not shrink with heat, nor will it adhere to wool, so I had to layer some merino roving to both sides and rub them to stick it to the netting. First the layering of merino roving in plum...

then wetting with warm water and soap, to allow the fibres to lock into each other.

Then roll up around a pool noodle and a bubble wrap (pool solar blanket) and tie securely.


Then roll and rub and roll and rub..... for a long time (with feet or hands), then eat lunch and roll some more...

You can see me knitting while rolling with my feet. Then unwrap and check and roll up again and repeat! The final fabric after rolling, then washing in hot with agitation, is a soft and light weight scarf, with (intentional) holes in the wool where the silver mesh shows through. I had to leave Susan's before the other gals had theirs done, and can't wait to see the finished fabrics. Here are Ruth and Fiona's scarves ready to roll... (and Lois starting to plan hers)

Fiona and Ruth's are in a double roll, so they joined forces and did a four foot rolling... they got a good rhythm going!

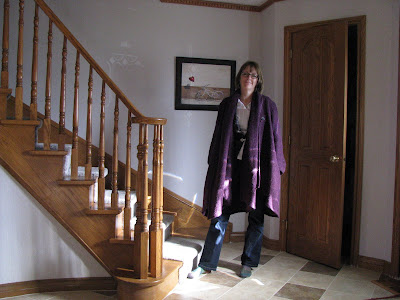
Here, Susan and I show off the final scarf... Thanks for being such a good coach, Susan!

The final photo has me wearing the scarf and it is still cold and WET, but I don't care because I made the fabric with my own hands (and feet!).

 I settled on my favourite scarfed swing coat, a good choice because the "wrong side" of the fabric plays a part in the design. The coat is McCalls 5987, an easy pattern that fits really well. The edges were just turned once and top stitched near the edge. (the plain fur side turned out to the outside to make a simple brown fur binding!)
  This coat pattern has no lining and the inside shows on the underside of the scarf, and when the coat is hanging open. I chose the make the brown underside fur as the top of the scarf to show as a contrast to the patterned fur on the outside of the coat.
  I also made a new felted scarf in a grid design. Very cute! The art of felting seems to have endless possibilities and everything I make is different and unusual. I will be trying lots more and posting here, so follow along! Also see my new blingy glasses. Marilyn 5046 in brown with meandering crystals on the temples.


 It will look even better on my friend, than it does on my grey model! Magical.
 and she chose a raw silk in Christmas red, with sheer shiny organza for the flower ruffles.... Very stuning.

 Above is open with the scarves hanging straight down, the front hem is curved and has a nice drape. A bit of a cape look to it, but more coat.
  Button closed and one scarf thrown over shoulder, the other hanging down.
 Easy to make and to wear. Oh, and it has good pockets too!

 all together fabulous!

 Hard to see but the photo shows the larger allowance on the top (pinned) and the smaller on the bottom. These pants have fine lines in the fabric, and I used them for guidelines for pinning.
 Finish the seams with zig zag stitch and cut the excess. Re-hem the bottom hem and press really well!
 It is hard to photo the stitches, because I use coordinating threads, but in the really close up you can see the meandering machine stitch that traces the lines of the various colours. The lines of quilting are about 1.5 inches apart. The final detail will be to stitch around the squares of white, and pale yellow-rose. These squares represent the centers of the lines and contrasts the darker tones.


 and after a long, hard day of fighting the bad guys, a Warrior princess likes to unwind at her favourite Martini Bar....
 Cheers darling Daughter (my own warrior princess!)
 The pieces were finished with Velcro fasteners to allow a snug fit to the arm.


 Photo through a mirror of me in the boot with the pad attached... not very clear but you get the idea...
 The outfit on my model.... starting to look almost finished!!!
 Only wrist and arm bands to work on. Good thing, as there is only two days left to finish.


 The other detail is the small metal embellishment at the lower front of the leather dress. This is made by drawing the pattern on paper, tracing it with the glue gun, twice. Then I sprayed it with gold paint. I peeled it off the paper, and glued it to the dress. I think I will also have to further secure it with some gold thread stitching. The glue may not be secure enough.
 Next, mounting the armour together, wrist and knee pads, and sward scabbard, and